In order to start using the AimBetter platform, you need to install the AimBetter Agent on at least one server in your company’s domain or workgroup with Windows OS.
This server will be denominated the Agent Server.
Once the AimBetter Agent is installed in the Agent Server, the monitoring can be configured for that server (local) or any other server (remote) in the same domain or workgroup.
This server will be denominated Monitored Server.
Multiple monitored servers can be configured for the same AimBetter Installation. The number of Monitored Servers depends on the number of acquired licenses. For further information about license options, please contact us at [email protected].
The Monitored Server can be changed at any time in the AimBetter configuration program or in the AimBetter platform. Read about changing the Monitored Server in the AimBetter UI.
Requirements
In the Installation Requirements Table, check the requirements for the Agent Server, where the AimBetter agent should be installed, and the Monitored Server you are interested in monitoring.
Troubleshooting
If you face any issues during the installation, check our Installation Troubleshooting.
Sign Up
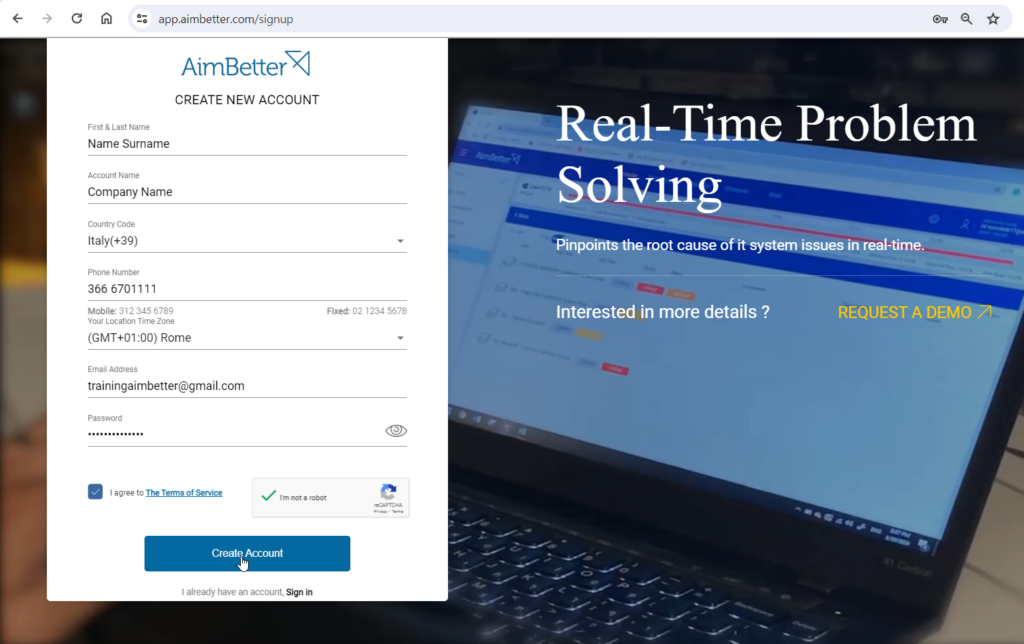
Fill out the Signup form before installing the AimBetter Agent.
Note:
- Only corporate email addresses are accepted. Personal email providers such as Gmail, Yahoo, and similar are not supported.
- If someone from your organization has already signed up, you won’t be able to submit the form again. Instead, you’ll see a message indicating that your company already has an account.
To check if the account is active and to add your email as a user, please contact us at [email protected].
Once all details are filled in, click “Create Account” to proceed.
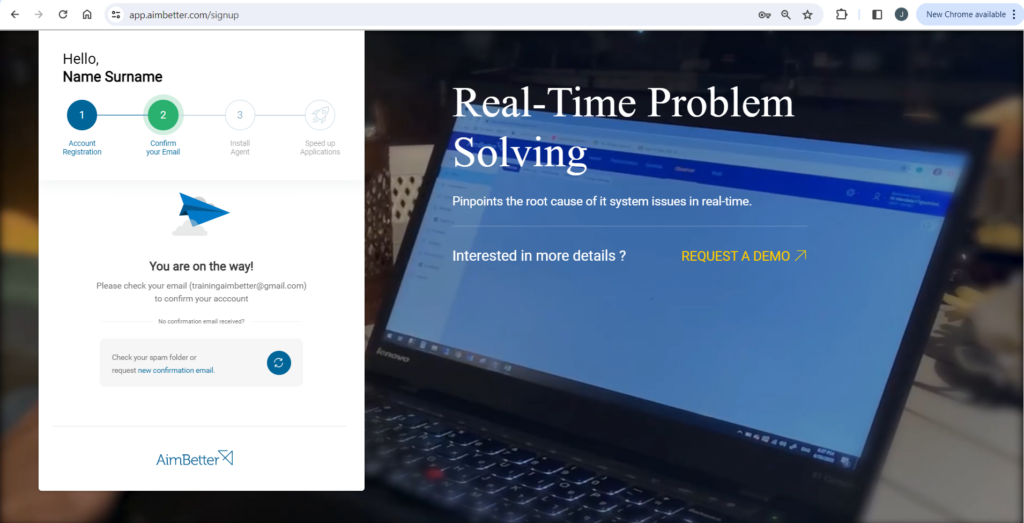
After filling out this form, you should receive an “AimBetter Account Confirmation” email in which you’ll be requested to verify your email address.
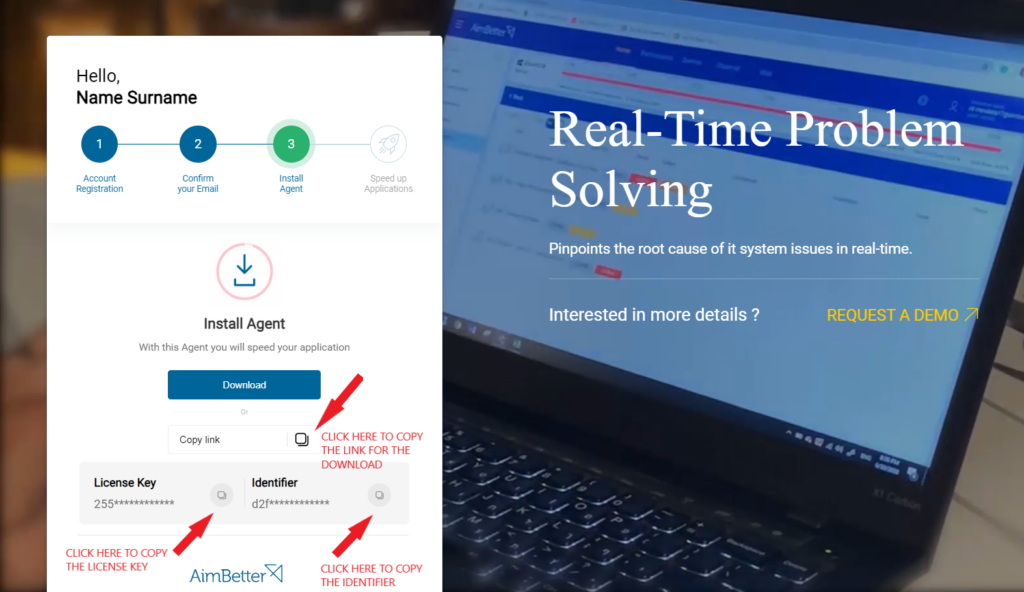
After the verification email, you should receive a “Welcome to AimBetter” email with your License Key and Identifier. These license details will also be available during the sign-up process on your browser.
Download the AimBetter Agent
As shown above, you can click the “Download” button during sign-up or copy the link to download the AimBetter Agent program “AimBetter_Agent.zip” to the Agent Server.
The Agent Server where the AimBetter Agent is installed must be a Windows OS server – check here the Agent Server requirements.
https://update.aimbetter.com/Aimbetter_Agent.zipOpen the Installation file and run it.
Ensure that the user running the “Aimbetter_Agent.zip” program has Administrator privileges (check if the user has Administrator privileges).
Facing an issue during this step? You can click here for troubleshooting.
AimBetter Configuration Program
Notice
If you have this program installed, search for “AimBetter Configuration” in the search box and open it.
It is recommended that this program be updated with the latest version.
After running the “Aimbetter_Agent.zip” program, the AimBetter Configuration window will be opened.
If you can’t run the “Aimbetter_Agent.zip” program, check our troubleshooting guide for installation.
Click on Activate your account.
Enter the License Key and Identifier you received via email or copied during the sign-up.
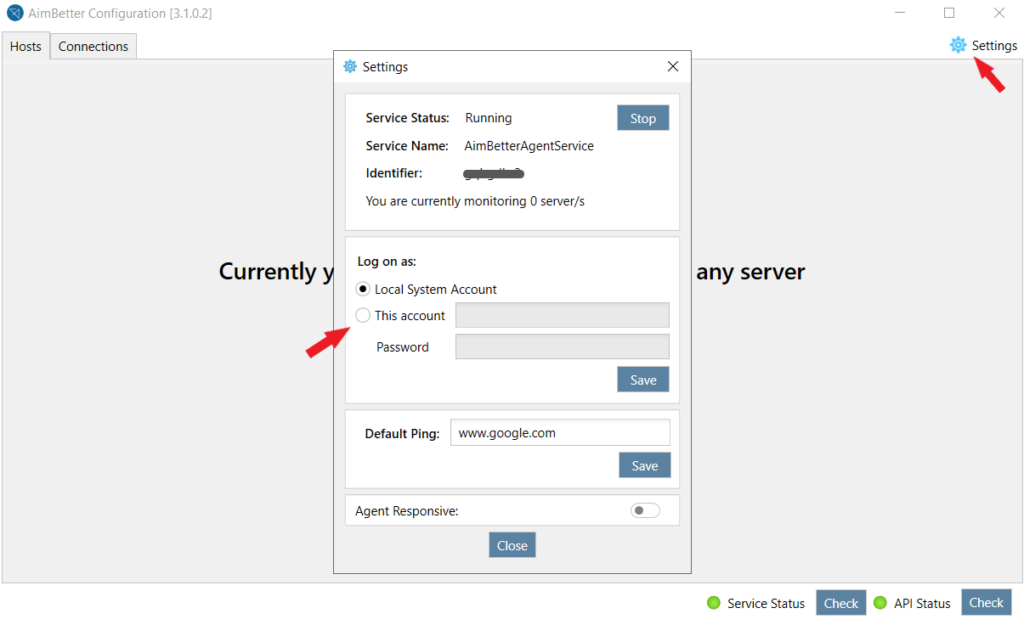
Choose one of the following:
Local System Account – if you install the AimBetter Agent on the Windows server you want to monitor. If you’re going to monitor a Linux or cloud server, you can also select this option.
This Account – in case you are installing the AimBetter Agent in a different server than the Windows server you intend to monitor (the Agent Server and the Monitored Server are not the same). In this case, use the credentials of a domain user with Administrator privileges or with Windows OS minimal permissions (check how to create a Windows OS user with minimal required permissions). For a non-domain network, make sure that the user has a local Windows OS user in both Agent and Monitored servers with the same username and password.
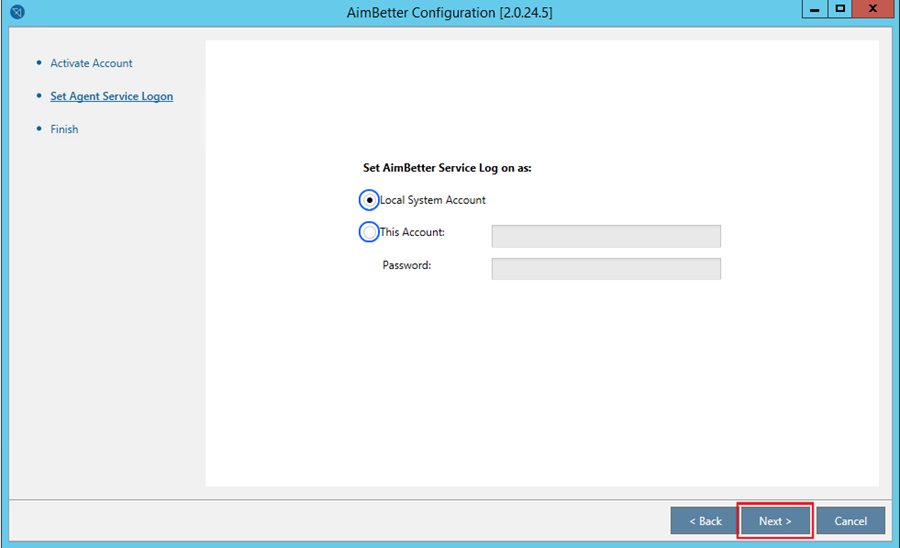
You can choose Local System Account and change it later to This account by clicking on the settings icon in the AimBetter Configuration.
You can also change the AimBeter Agent Logon in the Windows Services Manager app as follows.
Configuring the AimBetter Agent Service on the Windows Services Manager
1- Click on the Windows button and type Services
2- Open the Services window and look for the AimBetter Agent Service
3- Select this service, right-click Properties->Log On tab
4- Choose Log on as This account
5- Click on Browse -> Location and choose the right domain
6- Enter the login name of the Windows OS user (Administrator or created user with minimal permissions)
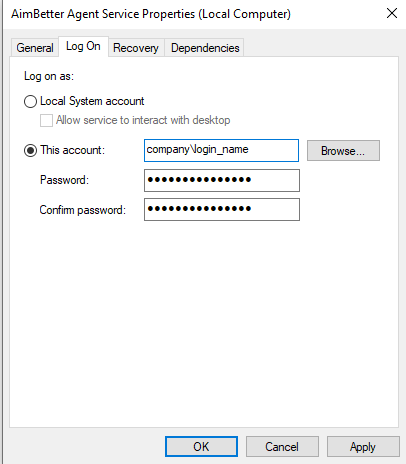
7- Enter the password, click on Apply -> OK, and restart AimBetter Agent Service
The AimBetter Agent service must be running in automatic mode.
Wait until you see the message “You have completed your account activation successfully“, and then click on Next.
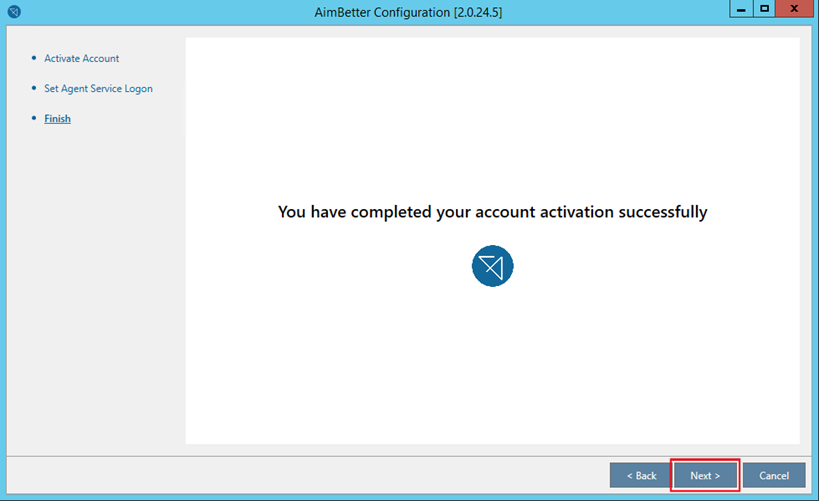
If you don’t receive the above message, check your License Key and Identifier and make sure that Port 433 is open.
Note about License Key
If you lost the License Key and Identification, try searching your mailbox again, including the Spam folder, or contact AimBetter support at [email protected].
Facing an issue during this step? You can click here for troubleshooting.
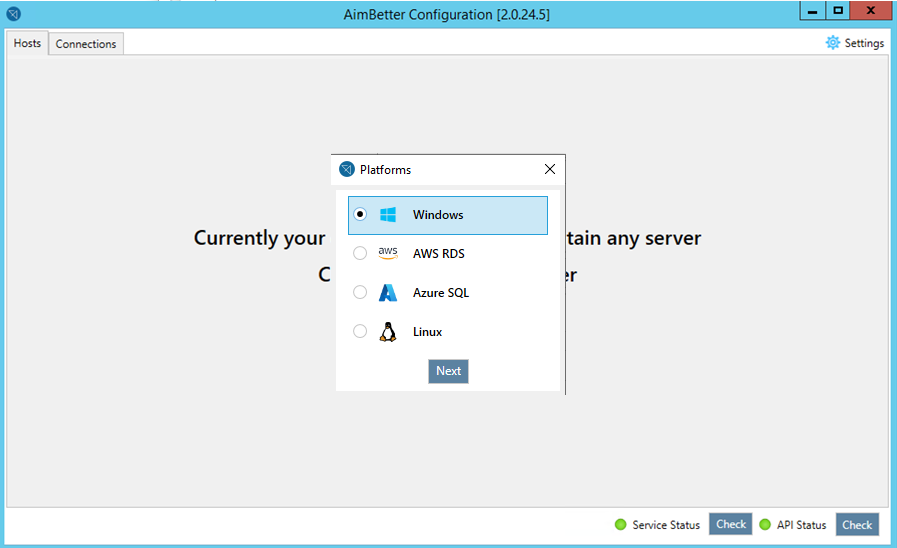
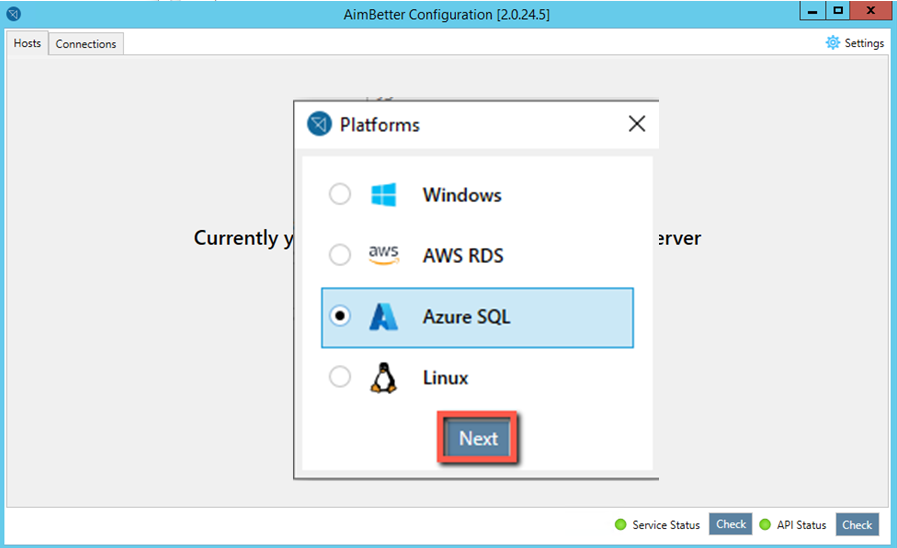
Add Server Host
Click on Add New Server and choose from the available Platforms the right one for your Installation:
 |  |  |  |

At this point, if there is a red light in the AimBetter Configuration, check our installation troubleshooting guide for “API status light is red“, or “Service status light is red“.
— Windows
Choose Windows from the available platforms
Note about License details
If you see the following message, “Your account reached the maximum number of hosts”, please contact the support team at [email protected] and check your license details.
Fill in the Server details:
Name: General display name (UI)
IP/Name: Server name or IP – For Local installation, you should insert a dot ( . ) in this field.
Credentials type: Windows Authentication
Note about Server name
To identify the exact name of the Server, open cmd and type hostname
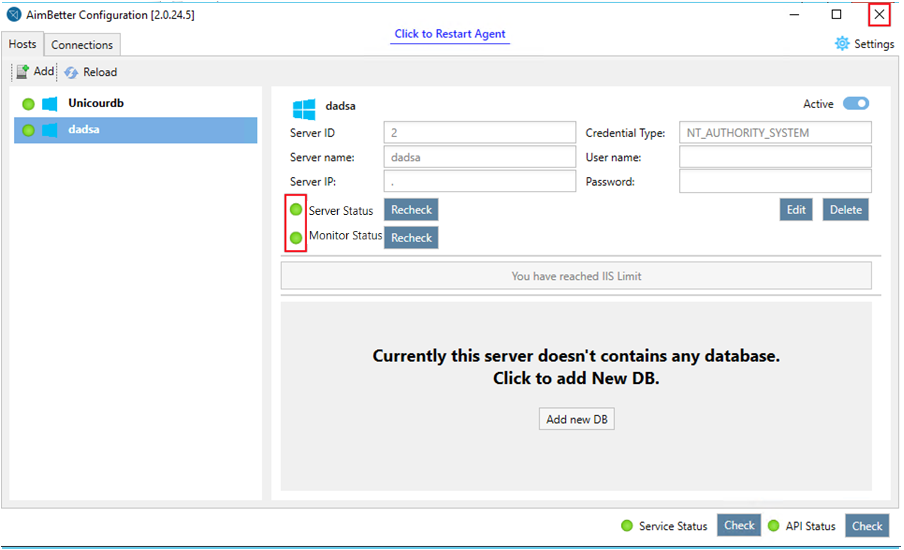
If all the settings are correct, you should see only green lights in the AimBetter configuration window and start seeing data on the AimBetter Platform. This data is related to the Operational System layer for now.
Proceed to the Database Server or Web Server configuration:
 |  |  |
**If there is a red light in the AimBetter Configuration, check our installation troubleshooting.
— Linux
Creating a Linux User
Ensure you create a new Linux user for the AimBetter Agent.
1- To create a Linux User with a home directory, which will be used by the AimBetter Agent, enter the Linux terminal with a user that has admin-level access and run the following script.:
sudo useradd -m aimbetter
We’ve named the username “aimbetter” but you can choose any username.
This user doesn’t need any special permissions.
2- Check that the user was created with the chosen username through this script:
ls -la /home/aimbetter/
3- After creating the aimbetter user, please select a password for the user by entering the next command (aimbetter is the created username):
sudo passwd aimbetter
Following this command, an empty box will be displayed with an option to insert the password.
Please insert your password and press enter.
If the password is not accepted according to the requirements, you will receive an error message and be requested to enter a new password.
If the password is accepted, you should receive a confirmation message.
Note: The created Linux user must run any commands from his Login shell. To check if you are using the Login shell, run the following command: ” $ echo $0 ” . If the result is “-bash” or “-su”, you are on the Login shell. Be sure that it has a hyphen (-) as a prefix.
Choose Linux from the available Platforms.
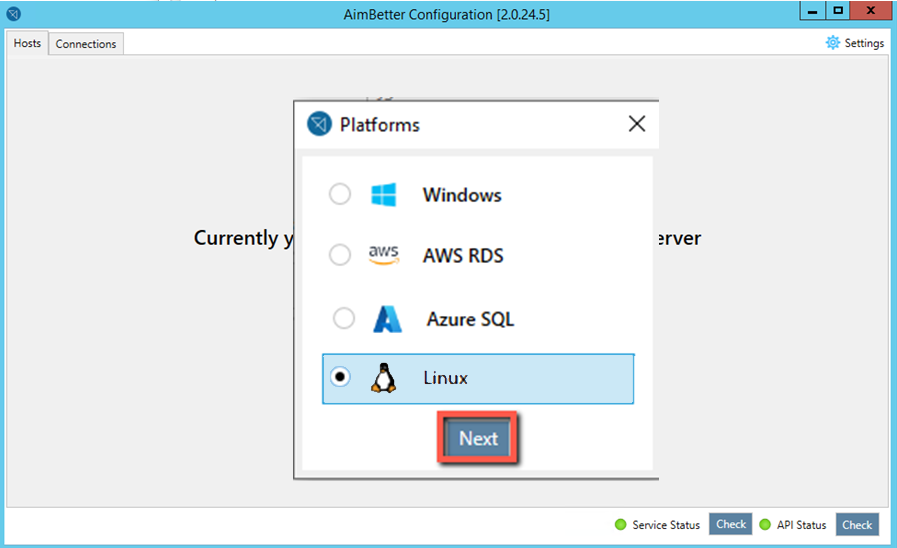
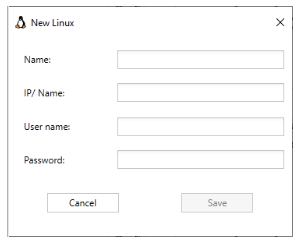
Fill in the Linux Server details.
Name – display name (UI)
IP/Name – the correct server name or IP
User name – the created Linux user
Password– the correct password for the created Linux user
Note about License details
If you see the message, “Your account reached the maximum number of hosts”, please contact the support team at [email protected] and check your license details.
Proceed to the Database Server configuration:
| |
**If there is a red light in the AimBetter Configuration, check our installation troubleshooting.
— AWS RDS (Amazon RDS)
Creating an IAM Login
Make sure you have created an IAM Login for the AimBetter Agent.
1- To create an IAM login with read permissions only on the RDS portal, enter the AWS Management Console with a user that has management privileges
Go to IAM and select Users
Click on Users -> Add user
2- In Set user details, fill in the field User Name* (choose the user name – for ex: AimBetterUser)
3- In Select AWS access type, select: Access type* -> Programmatic access
4- Filter and select policies:
AmazonDocDBReadOnlyAccess and CloudWatchReadOnlyAccess
5- Click on Next and finish the Create user steps
6- Make sure to copy and save the access key and security key
For more details, check Creating an IAM Login.
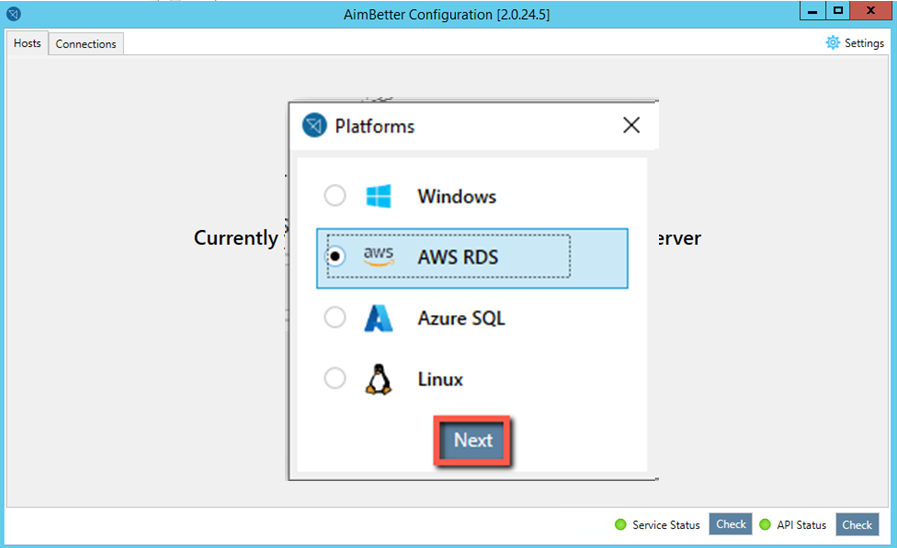
Choose AWS RDS from the available platforms
Note about License details
If you see the message “Your account reached the maximum number of hosts,” please contact the support team at [email protected] and check your license details.
Fill in the RDS Server details – you can get these details from the database panel, as shown in the image below.
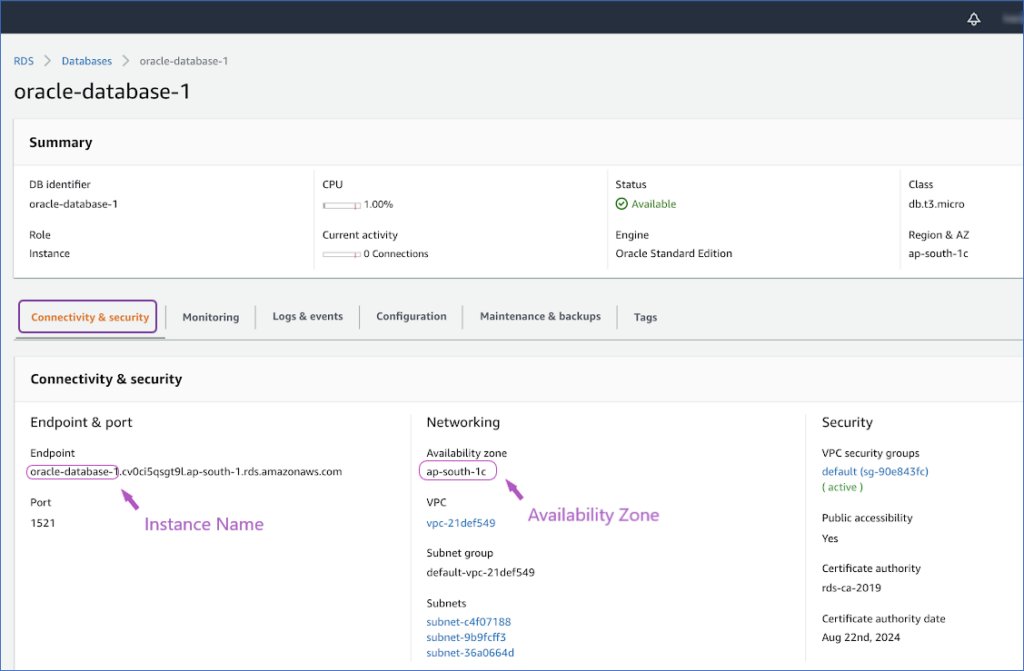
Name – display name (UI).
Instance – The instance name as shown in the above image.
Availability zone – Network’s availability zone on the RDS Database, as shown in the above image.
Access key and Security key– Details from the AimBetter user created with read permissions as explained before – for more information, check this link Creating an IAM Login. To get the access key, enter the user’s settings under IAM and refresh the access key for the updated security key also.
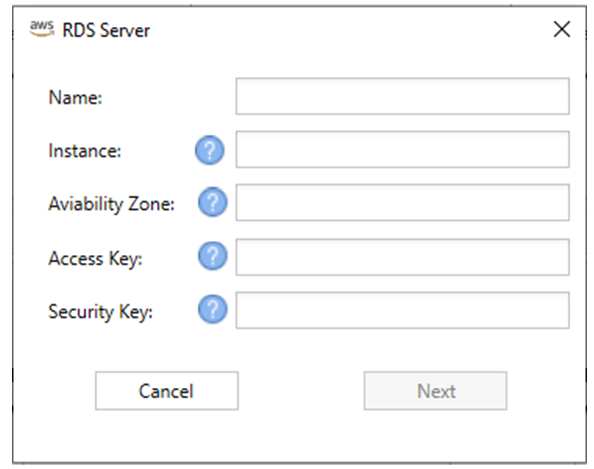
Clicking on the blue question marks gives you an image explaining how to locate the specific setting in the RDS platform.
Proceed to the Database Server configuration:
 | |
If there is a red light in the AimBetter Configuration, check our installation troubleshooting.
— Azure SQL
Choose Azure SQL from the available platforms
Note about License details
If you see the message “Your account reached the maximum number of hosts,” please contact the support team at [email protected] and check your license details.
Select SQL Server Type. Choose one of the following SQL Database or SQL Managed and click Next.
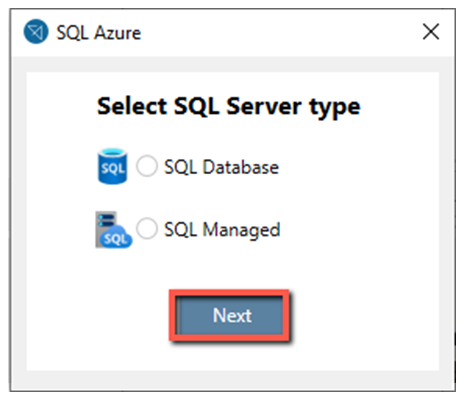
Note about the SQL Server type
Check how to identify your Azure SQL server type here.
Note about Secondary Database
If the Azure SQL Database is a Secondary one, check how to create a login with the Primary Database login SID
—-Azure SQL Database Instance
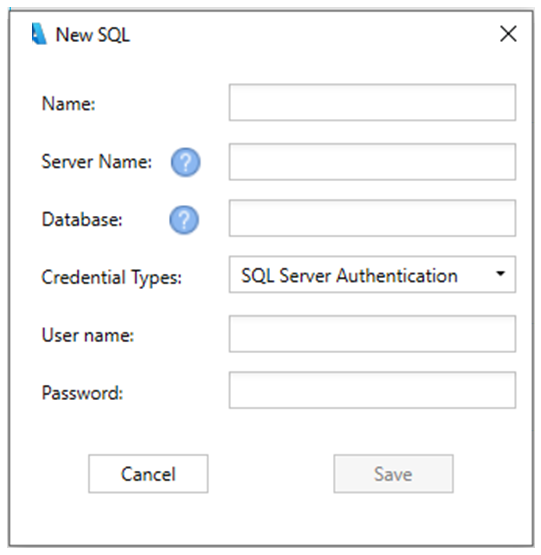
If Adding an Azure SQL Database Instance, fill in the following details:
Name – Name to be displayed on the UI
Server Name – Instance address: Full address + Domain + Port
Database – Database name (usually is the Instance address without Domain and Port)
User name and Password – MSSQL login and password (for creating a user with minimum requirement check Azure MSSQL Database – Create secured monitor user script)
—- Azure SQL Managed Instance
If Adding an Azure SQL Managed Instance, fill in the following details:
Name – Name to be displayed on the UI
Server Name – Instance address
User name and Password – MSSQL login and password (for creating a user with minimum requirement, check MSSQL On Prime / Azure Managed – Create monitor user script)
If there is a red light in the AimBetter Configuration, check our installation troubleshooting.
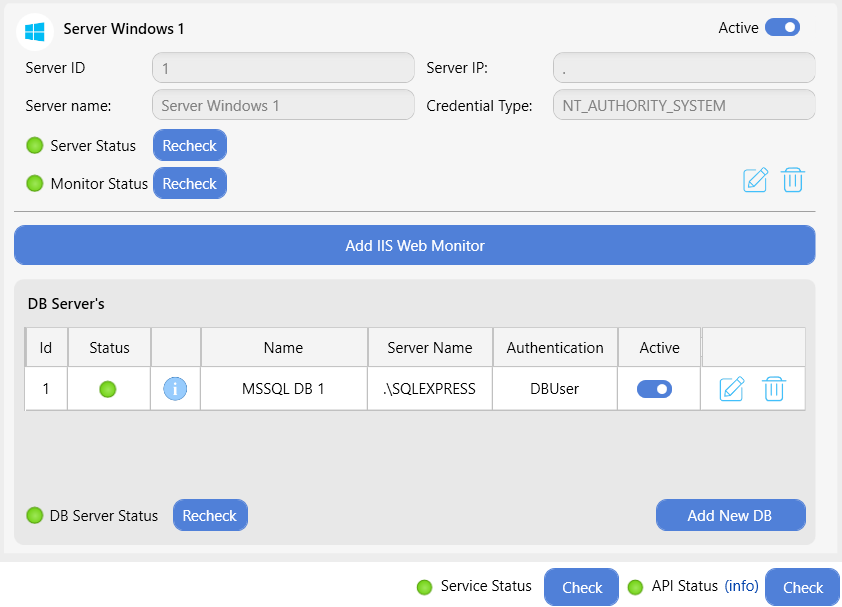
Add Database Server
— Microsoft SQL Server
Click on Add New DB to add the SQL Server instance to be monitored :
In Database type, choose Microsoft SQL and continue.
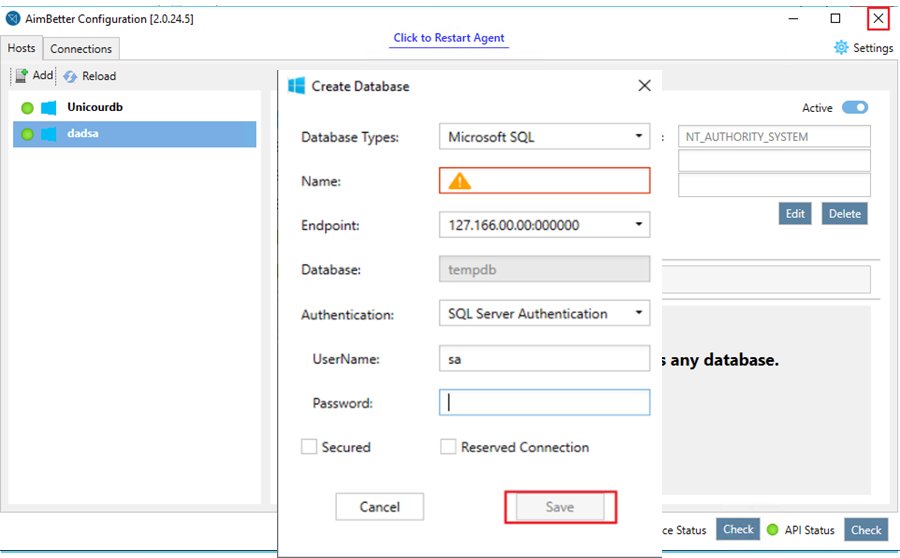
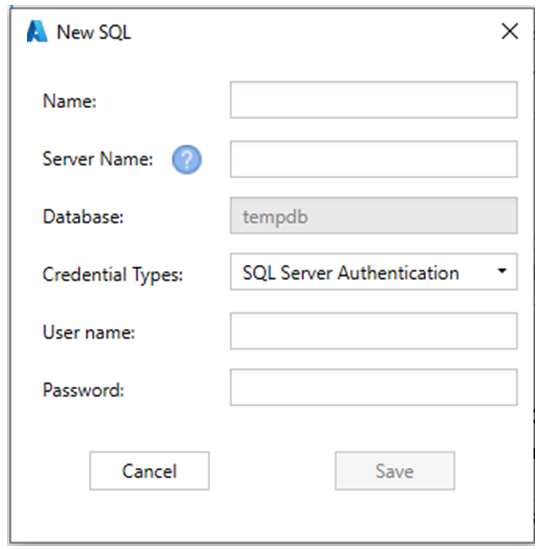
Fill in the MSSQL instance details and click on Save:
Name: General display name (UI)
Endpoint: Choose the correct instance from the list
Authentication: choose Windows or SQL Server Authentication (see the notes about Authentication below)
Username: The SQL Server user name
Password: The SQL Server user password
Secured: Selecting this option will exclude sample data when retrieving query plans, protecting potentially sensitive information from unintentional exposure.
Reserved Connection: Selecting this option will keep a persistent connection to the database instead of the default opening a connection when needed and then closing it.
Notes about Authentication
Windows Authentication:
– The user should have Administrator permissions or
– The user should be a Windows OS user created with minimum permissions.
SQL Server Authentication:
– Use the credentials of a new MSSQL user created with sysadmin permissions or
– Use the credentials of an existing sysadmin MSSQL user or
– Use the credentials of an MSSQL user created with minimal permissions.
If the connection still doesn’t work, check the number of instances and whether you are connected to the right one.
Clustered Instances
In the case of Clustered Instances, instead of choosing the instance name from the list, you have to write the unique instance name only, for example, UNIQUE_INSTANCE_NAME and not the complete name SERVER_NAME/UNIQUE_INSTANCE_NAME.
If all the settings are correct, you should see only green lights in the AimBetter Configuration window.
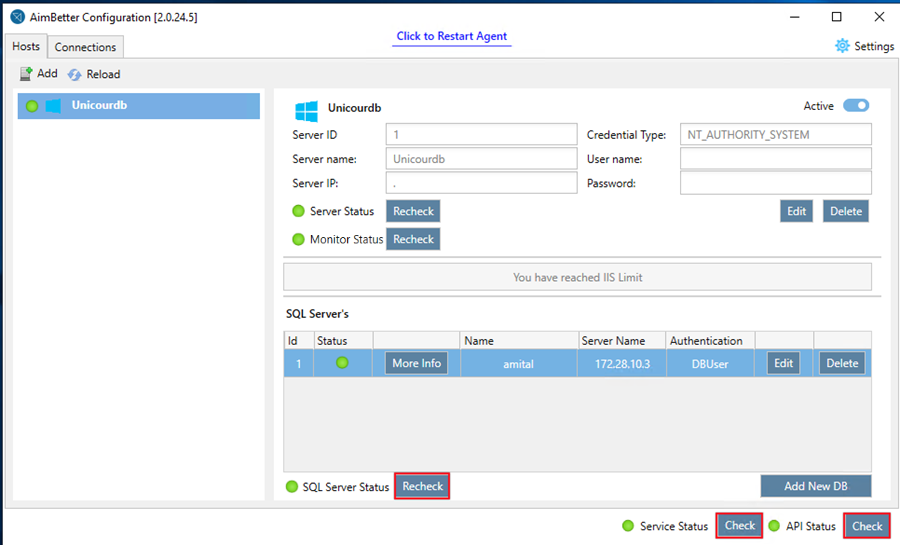
If any lights are red, please check the Troubleshooting Installation Issues cases or contact our support team at [email protected].
At this point, if there is a red light in the AimBetter Configuration, check our installation troubleshooting.
— Oracle Database
Click on Add New DB to add the Oracle Database to be monitored :
In Database type, choose Oracle and continue.
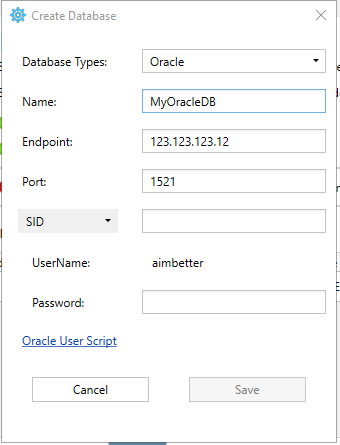
Fill in the Oracle instance details:
Name: General display name (What you will see on the AimBetter UI).
Endpoint: Type the Oracle Hostname or Server IP.
Port: Enter the correct port number (default is 1521).
SID or Service Name: Enter the Oracle Database SID (check below how to retrieve the SID) or Service Name.
To retrieve the SID:
- on Windows: Look for the service that begins with
OracleServicelikeOracleService<INSTANCE_NAME>. The part afterOracleServiceis the SID.
- on Linux: Check the
ORACLE_SIDvariable by typingecho $ORACLE_SIDon bash.
Username: aimbetter (check below how to create this user).
A sysdba user must create an Oracle user named aimbetter with the following script:
- on Windows or Linux: Script for Oracle aimbetter user on-premise
- on Amazon RDS: Script for Oracle aimbetter user on AWS RDS
Password: the aimbetter user’s password
If all the settings are correct, you should see only green lights in the AimBetter Configuration window.
At this point, if there is a red light in the AimBetter Configuration, check our installation troubleshooting or contact our support team at [email protected].
— Redis Database
Notice:
For Redis monitoring, the AimBetter Agent must be installed locally on the Redis Server by a user with Administrator privileges. Check if the user has Administrator privileges.
Click on Add New DB to add the Redis Database to be monitored :
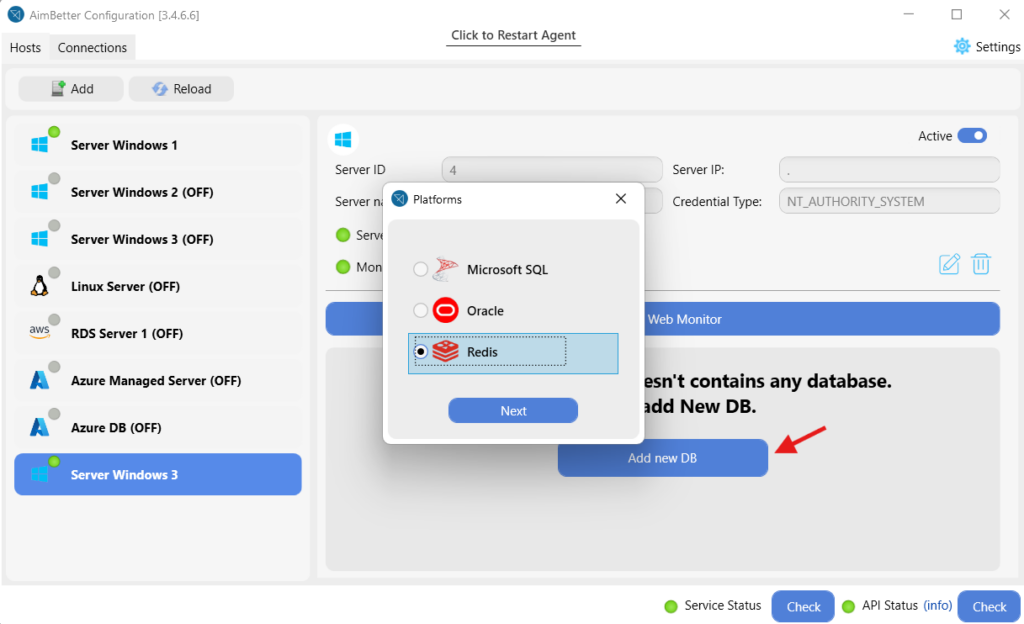
Fill in the Redis database details:
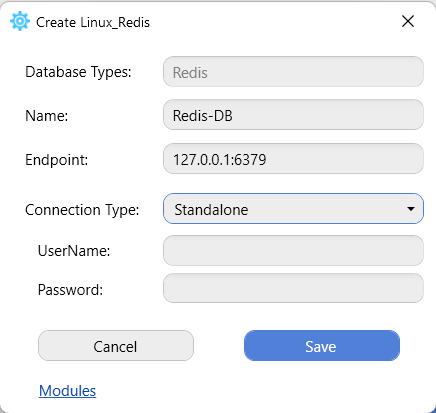
Name: General display name (What you will see on the AimBetter UI).
Endpoint: 127.0.0.1:6379 (local host IP: port).
Connection Type: Select Standalone.
UserName and Password: If not needed to connect to the Redis DB, leave it blank.
If all the settings are correct, you should see only green lights in the AimBetter Configuration window.
At this point, if there is a red light in the AimBetter Configuration, check our installation troubleshooting or contact our support team at [email protected].
Add Web Server
— IIS
Click on Add IIS Web Monitor:
Notice:
For IIS configuration, the AimBetter Agent must be installed locally on the Web Server by a user with Administrator privileges. Check if the user has Administrator privileges.
If there is no IIS program running on the server, you will see the following message:
“Didn’t find IIS”
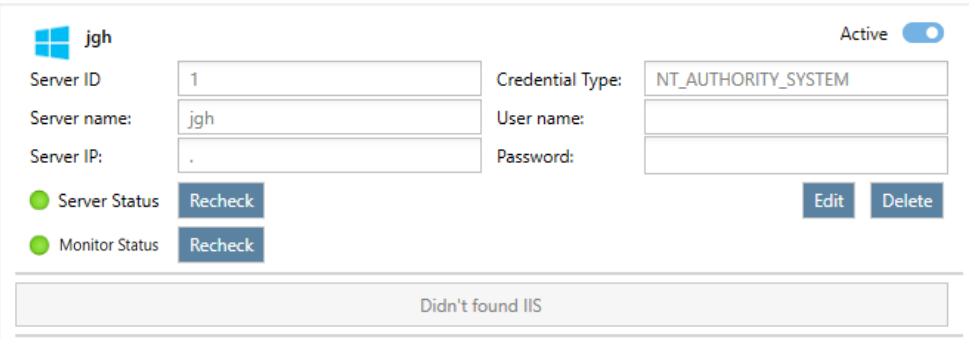
Select the framework in which the applications running on the Web server were developed.
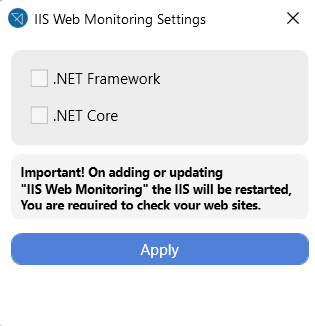
Note that on adding or updating the IIS Monitoring, the IIS will be restarted.
After the IIS configuration, the IIS Status light should be green, and you should start seeing data on AimBetter’s Web module.
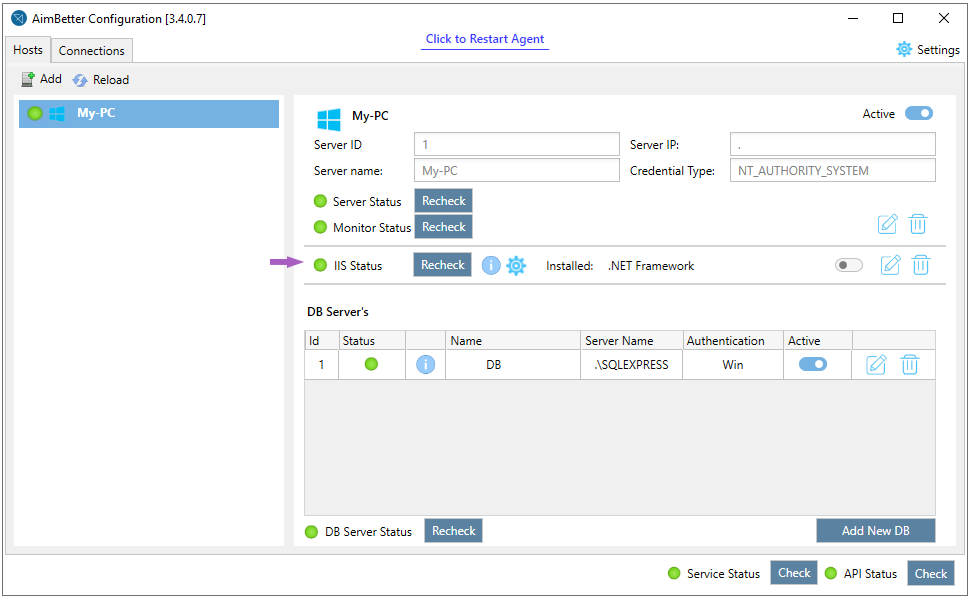
AimBetter sends test requests to ensure the web monitoring is functioning well.

If the IIS Status is red light, click on the info icon beside the Recheck button and check our installation troubleshooting – IIS Status is red.
Final Step
Click on Reload to ensure that all servers are in an operational state
Check that all the lights are green.
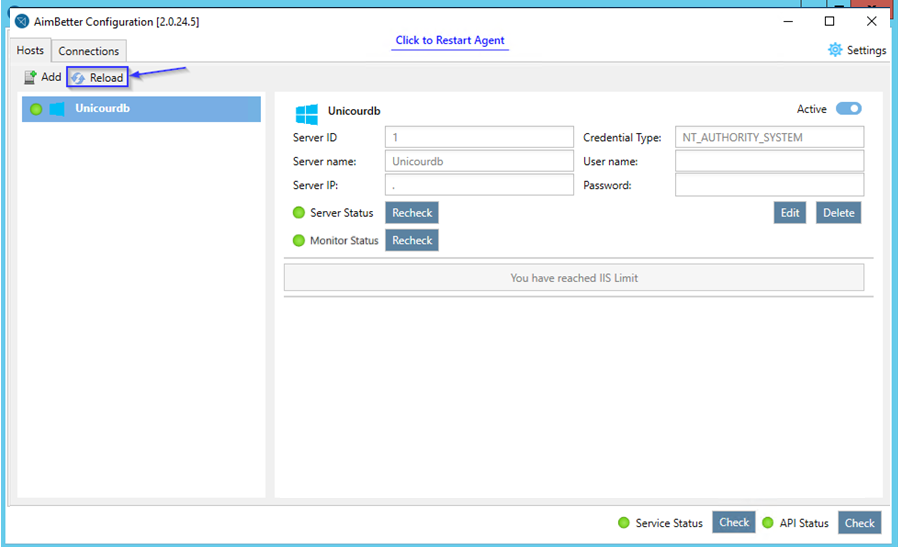
If any lights are red, please check the Troubleshooting section or contact our support team at [email protected].
Finish the Installation by closing the AimBetter Configuration window.
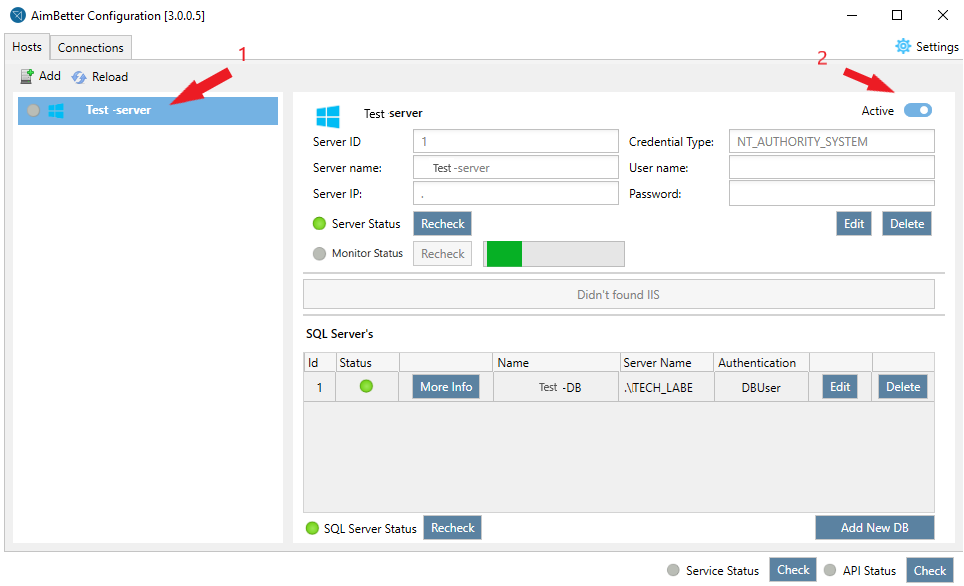
Note about the Active button
To keep a specific server’s settings in the AimBetter configuration while stopping it from sending data, click on the Active button and turn it off. This server will not be counted in the license count.
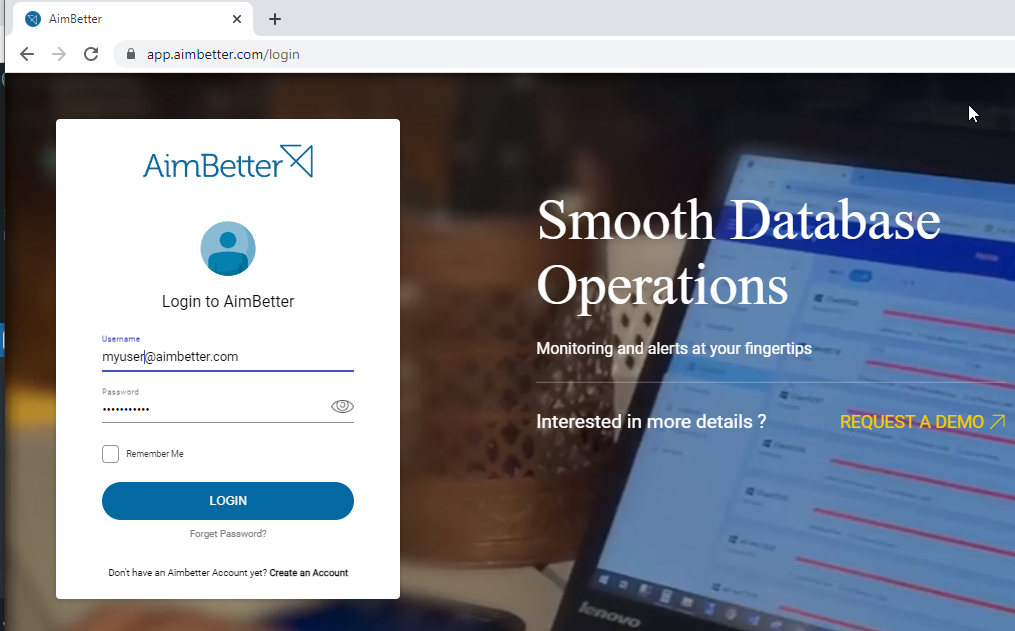
Login to AimBetter
Open the following link, https://app.aimbetter.com
Fill in the AimBetter user details:
Username– Registration email
Password– If this is your first time logging in, click on “Forgot Password” and create a new password
Disable/ Enable a Server
Any configured server can be easily disabled in the AimBetter Configuration program.
To disable a server, click on the name of the server you want to disable from the list on the left side of the “Hosts” tab in the AimBetter Configuration window. Then, change the Active button to the off position on the upper side of the window.
To enable a server, simply toggle the Active button to the “on” position.
Responsive Agent
The responsive feature is disabled by default. To enable it, open the AimBetter Configuration program, click the settings icon, and toggle the Responsive Agent to “On”.
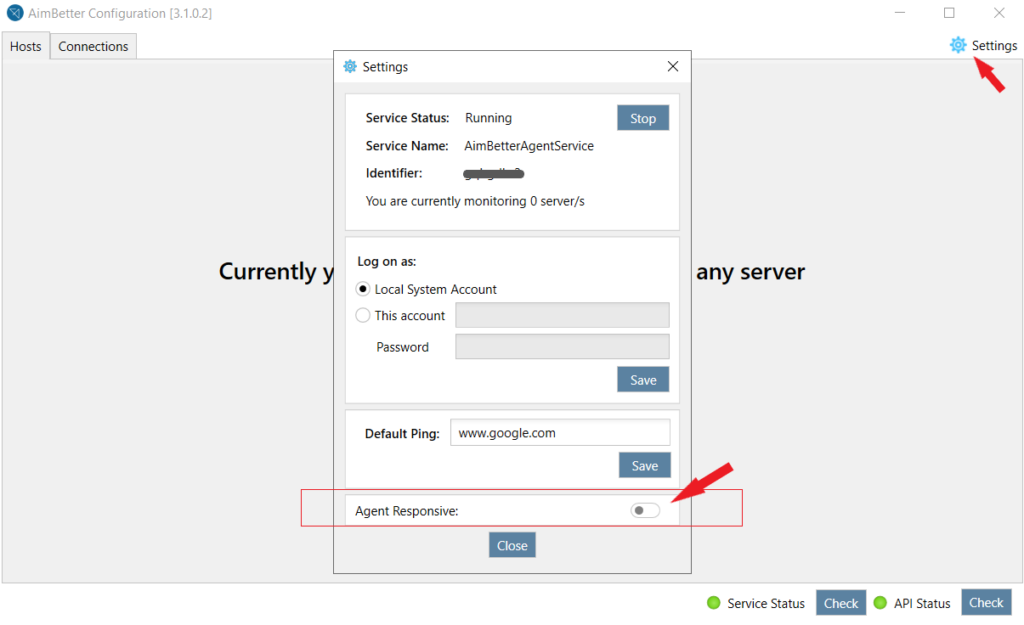
Read about what you can do with the Responsive Agent.
Notice that the user running the AimBetter Agent service needs Administrator privileges to perform these actions, and they will be executed only after being approved with a code sent to the account’s administrator.
For any questions or assistance, please contact us at [email protected].

 +1 (650) 449-8622